

Aging in Place Bathroom Design: An Adelaide Builder’s Guide
A lot of people start thinking about an aging-in-place bathroom after a small scare. It might be a wet tile underfoot, a hand reaching for a towel rail that was never meant to take body weight, or the first time stepping over the bath feels awkward instead of automatic. Nothing dramatic has happened, but the bathroom suddenly feels less forgiving than it used to.
That moment matters because bathrooms are where poor layout, hard surfaces and water all meet in one compact space. If you're planning to stay in your Adelaide home for the long term, this is usually the smartest room to address first. Good aging in place bathroom design isn't about making your home look clinical. It's about building a room that still feels like your home, while subtly removing the things most likely to cause trouble later.
From a builder's perspective, the best results come when safety, budget and construction sequencing are sorted early. Homeowners often focus on products first. The better approach is to start with how the room needs to work, then choose the materials and fixtures that support that brief.
Future-Proofing Your Home Starting with the Bathroom
Most homeowners don't need a lecture on independence. They already know what they want. They want to stay in the home they know, keep their routines, and avoid a rushed renovation after an injury or health change. The bathroom is where that planning becomes practical.
Aging in place bathroom design starts with an honest look at daily use. Not ideal use. Actual use. Can you move through the space comfortably first thing in the morning, when you're stiff, tired, or carrying washing? Can you reach what you need without twisting, bending hard, or balancing on one foot?
Start with the routine, not the fittings
Before you talk to a builder, walk through the whole bathroom routine in your head.
- Entry and approach: Is the path to the bathroom clear at night, and is the doorway easy to open if your hands are full or your grip isn't strong?
- Shower use: Are you stepping over a hob or bath edge, and does that feel steady when the floor is wet?
- Toilet access: Is there enough room beside the pan to turn, brace, or assist someone if needed?
- Vanity use: Do taps require finger strength, and can you use the mirror and basin comfortably while seated if that ever becomes necessary?
- Storage reach: Are daily items stored between shoulder and knee height, or are you stretching high and bending low every day?
This sounds basic, but it's where most good projects begin. If the brief is vague, the renovation usually ends up half cosmetic and half compromise.
Practical rule: If a feature only works when you're strong, dry, fully balanced and moving well, it isn't future-proof.
Questions worth asking now
A short self-audit can save a lot of redesign later. Ask:
- Mobility: Could I use this room with a walking stick, walker or after surgery?
- Vision: Is there enough light to see the floor clearly and read labels or medication packaging?
- Dexterity: Can I turn taps, operate the door mechanism, and operate the shower without gripping hard?
- Fatigue: Is there anywhere to sit, rest or steady myself without improvising?
- Support: If I needed help in the future, could another person fit in the room and assist safely?
Families often find it helpful to look beyond the bathroom itself and consider broader guidance on improving home safety for older adults. It helps frame the bathroom as part of a larger decision about staying safely at home, not just a standalone renovation.
Plan for the version of you that needs less effort
You don't need to predict every future health issue. You do need to reduce reliance on balance, strength and fine motor control. That's the thread running through every strong aging in place bathroom design. Less stepping over. Less twisting. Less reaching. Less guesswork in low light.
In Adelaide homes, that often means dealing with older bathroom footprints, raised shower bases, narrow doors and layouts that were never designed for mobility aids. None of that makes a renovation impossible. It just means the design brief has to be grounded in how the room will work over time, not just how it will photograph at handover.
Planning Your Layout for Safety and Accessibility
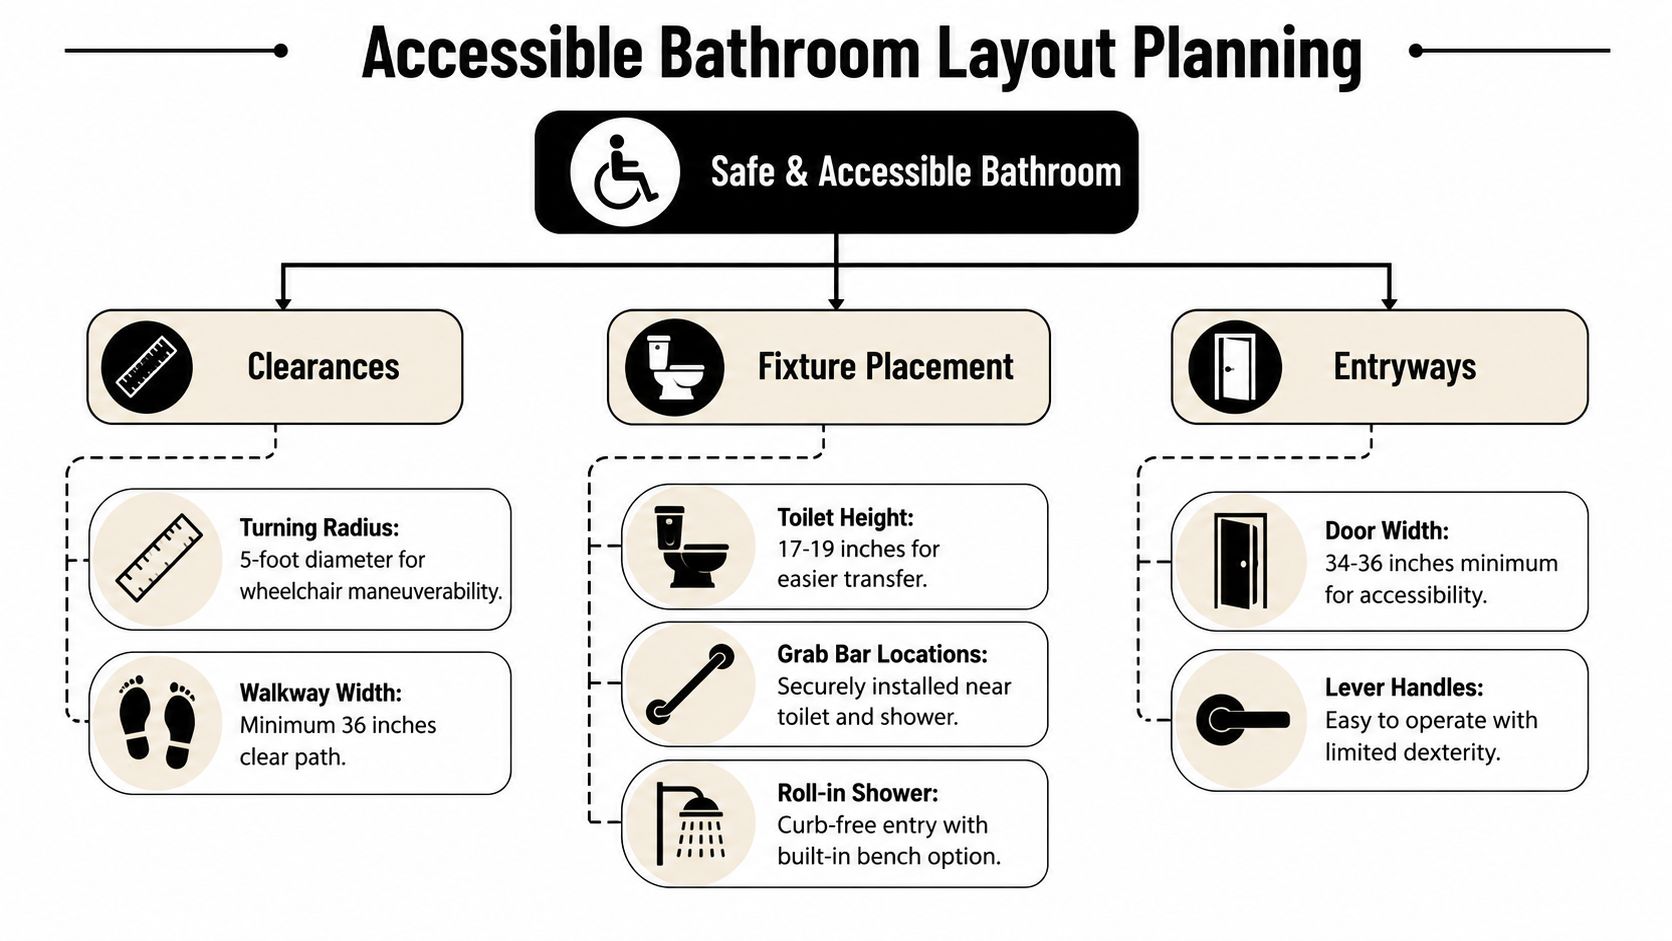
A safe bathroom usually feels easier before it looks different. That's the value of Universal Design. It doesn't read as special-purpose design. It reads as a bathroom that's comfortable to move through, easy to understand and forgiving to use.
For homeowners new to the idea, this overview of universal design in the home is a useful starting point. In practical terms, it means building a room that works well whether you're healthy, injured, aging, helping a partner, or hosting visiting family with different mobility needs.
The layout matters more than the product list
I've seen expensive fittings installed into poor layouts, and the room still didn't work. A beautiful grab rail won't fix a toilet jammed too close to a vanity. A premium shower screen won't help if the entry pinches movement.
What works is a clear floor plan with unobstructed movement. You want space to enter, turn, approach each fixture directly, and step away without sidestepping around corners. That often means simplifying the room, not adding more into it.
Consider these layout priorities:
- Clear circulation: Leave open floor area where movement naturally happens, especially between the door, vanity, toilet and shower.
- Straight approaches: Wherever possible, approach the shower and toilet front-on rather than at an awkward angle.
- Space beside fixtures: Extra side clearance around the toilet and shower entry makes transfers, bracing and assistance much easier.
- Door swing conflicts: Check that an open door doesn't block the vanity, toilet or emergency access.
Curbless showers solve a real problem
The most valuable layout improvement in many bathrooms is the curbless shower. It removes the lip or step that catches feet, walking frames and tired legs. It also makes the room feel larger and easier to clean.
Getting one right takes more than deleting a hob. The floor has to be reworked so water falls correctly to the drain, the waterproofing has to be spot on, and the shower area needs enough room for a person to stand, turn, or sit if needed. In some Adelaide renovations, that means recessing the slab, rebuilding the floor structure, or reconfiguring adjoining walls. That's why this decision needs to happen early in design, not after tile selection.
A walk-in shower only improves safety if the floor drains properly and the entry stays clear. Poor falls and cramped planning undo the benefit.
Doorways, turning room and everyday usability
Accessibility isn't just about wheelchairs. A slightly wider doorway and a bit more turning room help anyone using a walker, recovering from surgery, carrying laundry or assisting a spouse.
In older homes around Adelaide, tight bathroom entries are common. Sometimes widening the opening is straightforward. Sometimes it affects framing, switches, towel rails or nearby built-in joinery. Pocket doors can work well in selected layouts because they remove the arc of a swing door, but they need proper planning inside the wall cavity and they aren't always the best answer if wall depth, services or acoustic privacy are concerns.
A good test is simple. Stand in the room and imagine using it on a bad day, not a good day. If every movement requires adjustment, the layout is too tight.
What usually works best
Rather than treating accessibility as a checklist, think in terms of flow.
- Shower at the far end: This often creates a cleaner path through the room.
- Toilet with usable side space: Better for transfers and easier if support rails are needed.
- Vanity positioned to avoid bottlenecks: Especially important in narrow bathrooms.
- Minimal level changes: Any threshold or lip becomes more noticeable over time.
The best aging in place bathroom design doesn't force you to think about the room while you're using it. It supports the routine quietly, with enough space in the right places and no awkward moves built into the plan.
Choosing Materials and Fixtures for an Ageless Bathroom
Once the layout is right, the next decisions are about touch, grip, maintenance and durability. Many bathroom renovations go off course at this stage. Homeowners pick finishes by showroom look, then live with slippery floors, fiddly tapware and surfaces that are harder to keep safe than they expected.
An ageless bathroom should still look good. It just needs to earn that look in day-to-day use.
Fixtures that reduce strain
Some choices are consistently easier to live with over time.
- Lever tapware: Better than round knobs for arthritic hands, reduced grip strength and quick operation with soapy hands.
- Handheld shower on a rail: More flexible than a fixed shower head, especially if seated showering becomes useful later.
- Comfort-height toilet: Usually easier on knees, hips and lower back than a lower pan.
- Reinforced walls: Even if you don't want grab rails installed immediately, get the wall framing prepared during the renovation.
- Drawer-based vanity storage: More practical than deep cupboards where items disappear at the back.
Where homeowners sometimes get caught is choosing trendy pieces that are harder to use. Thin pin taps, vessel basins with limited deck space, and floating shelves above shoulder height often look sharp in a display suite and frustrate people at home.
The best fixture is the one you can use safely without thinking about it, even when you're tired, sore or in a hurry.
Grab rails can look intentional
A lot of people still picture hospital rails. That's outdated. Good suppliers now offer rails in finishes that match tapware and shower fittings, and some designs integrate neatly with shelves or towel storage.
What doesn't work is pretending support won't ever be needed. Standard towel rails are not support devices. If someone grabs one during a slip, it can fail. Proper rails need secure fixing into structure, and that detail matters more than the finish.
Flooring is where safety and cleaning collide
Flooring carries the biggest trade-off in the room. More texture usually improves grip, but very rough surfaces can be harder to mop clean. Large smooth tiles reduce grout lines, but some are too slippery when wet. Small mosaics create more grout joints and usually better traction, but they can increase cleaning effort and, if poorly laid, feel busier underfoot.
Below is a practical comparison table. Because no verified product-by-product data has been provided for this article, the table stays qualitative where ratings and pricing would otherwise need formal sourcing.
| Material | Slip Resistance (AS 4586 Rating) | Maintenance | Cost Per m² (Supplied & Installed) | Comfort Underfoot |
|---|---|---|---|---|
| Textured porcelain tile | Varies by product. Check manufacturer certification before selection. | Easy to moderate, depending on grout choice and tile texture | Varies by tile range, format and site conditions | Firm, stable, can feel hard in winter |
| Ceramic tile with matte finish | Varies by product. Needs project-specific verification. | Generally straightforward, but depends on grout and finish | Varies by supplier, tile size and installation complexity | Firm underfoot |
| Mosaic tile | Varies by product. Often chosen for extra grip from grout lines | More grout means more cleaning effort | Usually higher installation cost due to labour intensity | Good traction, but grout texture is more noticeable |
| Luxury vinyl plank or sheet vinyl suitable for wet areas | Product dependent. Must be specified for bathroom use | Easy to clean, fewer grout concerns | Varies by substrate prep and product quality | Softer and warmer than tile |
| Honed or textured natural stone | Varies widely. Needs careful product selection and sealing plan | Higher maintenance, sealing often required | Usually at the premium end due to material and labour | Solid feel, often cooler underfoot |
Finishes that age well
If you want the room to hold up visually, use a restrained palette and let texture do the work. Matte tiles, warm neutrals, brushed finishes and simple profiles tend to date better than highly reflective surfaces and novelty details.
In Adelaide, I also encourage homeowners to think about maintenance in our conditions. Hard water spotting, soap residue and dust show faster on some finishes than others. A material that's slightly more forgiving can save a lot of frustration over the life of the bathroom.
Illuminating Your Design with Safety Lighting and Tech
Lighting is one of the easiest things to undervalue in a bathroom renovation. People notice tiles and tapware first. They notice bad lighting every day after handover.
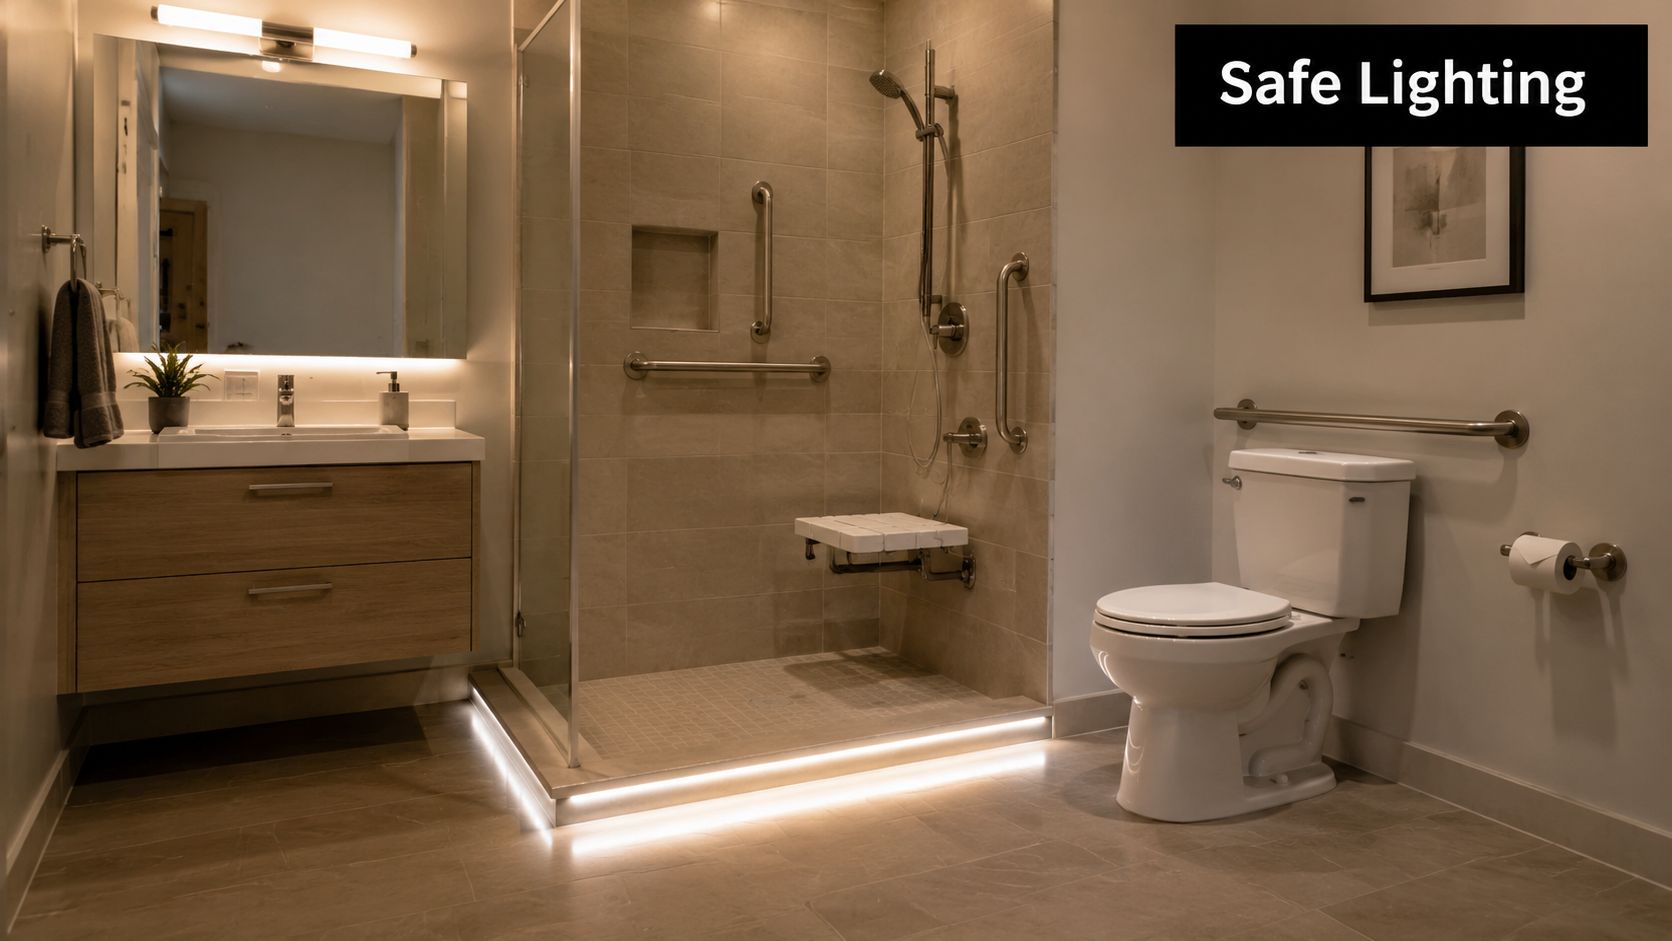
A safe bathroom needs light where decisions happen. At the doorway. Along the path at night. At the vanity where grooming, shaving, make-up and medication all happen. In the shower where shadows can hide edges and controls.
Use layered lighting, not one bright fitting
A single ceiling light in the centre of the room rarely does the job. It throws shadows where you don't want them and often feels harsh at night.
A better approach uses layers:
- Ambient lighting: General overhead illumination so the room feels evenly lit.
- Task lighting: Focused light at the mirror and vanity so faces, hands and labels are clear.
- Safety lighting: Low-level guidance lighting for night-time visits, especially around the floor line and entry path.
If you're choosing vanity lights, this guide on choosing lights over a mirror is useful for understanding fixture placement and how to reduce unhelpful facial shadows.
Small lighting decisions that make a big difference
Base-level strip lighting under a vanity is one of my favourite inclusions in an aging in place bathroom design. It gives enough orientation at night without forcing your eyes to adjust to full brightness. Motion sensors are also useful in the right setting, particularly for late-night bathroom visits.
Other practical upgrades include:
- Switch placement near the entry: Easy to reach without stepping into a dark room.
- Contrasting surfaces around controls: Helps fittings stand out visually.
- Shower lighting that avoids glare: Bright enough to see, but not so sharp it reflects off wet tile.
- Mirror lighting from the front or side: Better than relying only on a downlight above your head.
Smart tech should remove effort
Not every bathroom needs smart features. The ones worth including are the ones that reduce physical effort or improve consistency.
Voice-activated lights, heated flooring controls, sensor lighting, and smart switching can all help if mobility or dexterity changes over time. For homeowners considering broader connected upgrades, this look at smart home installation options gives a sense of what can be integrated during a renovation rather than bolted on later.
A short visual example helps make the point:
Keep technology simple to operate
Smart tech fails its purpose if it becomes confusing. Choose controls that are intuitive, easy to override manually and unlikely to frustrate a less tech-confident user. Good bathroom technology should fade into the background. It should help the room respond better, not demand attention.
Managing Your Budget and Adelaide Council Compliance
Budget stress usually comes from uncertainty, not just cost. Homeowners can accept that structural work, waterproofing and quality fixtures have a price. What they struggle with is not knowing what will push the figure up, what might trigger approvals, and what happens if hidden issues appear after demolition.
In Adelaide, bathroom renovations vary widely in scope. A straightforward upgrade that keeps fixtures in roughly the same place is a different job from a full aging-in-place remodel involving doorway changes, shower recessing, wall framing adjustments, drainage relocation and upgraded electrical work. The more you alter the bones of the room, the more labour, coordination and contingency you need.
What drives the budget up or down
The biggest cost drivers are usually not the tapware or tiles. They're the behind-the-wall decisions.
- Layout changes: Moving plumbing wastes, water points and drainage usually costs more than reusing existing locations.
- Structural works: Widening doors, rebuilding floors for a curbless shower, or altering walls can add complexity quickly.
- Waterproofing detail: Wet area preparation has to be done properly. This isn't a line item to squeeze.
- Fixture level: Standard-quality fittings and premium branded fixtures both work, but they sit in different budget bands.
- Access and site conditions: Tight access, upper-storey bathrooms and older home surprises affect labour and timing.
I've found that homeowners manage budgets better when the selections are grouped into priorities. Safety and structural function first. Everyday usability second. Decorative upgrades third. That order keeps the room performing even if a few cosmetic choices need to be adjusted.
Good estimating starts before demolition
One of the reasons bathroom budgets blow out is that too many assumptions get made early. Detailed take-offs, fixture schedules and plumbing coordination matter. Even if you're never using estimation software yourself, it's worth understanding why builders rely on structured systems. Tools such as Exayard plumbing estimating software show how much detail sits behind wet-area pricing, especially when multiple plumbing changes and fixture selections are involved.
Hidden costs often aren't random. They're the result of unclear scope, rushed selections or discovering that the old room wasn't built as expected.
Adelaide approvals and compliance
Not every bathroom renovation needs the same level of council involvement, but homeowners shouldn't assume it's all exempt. If you're changing structure, affecting drainage significantly, altering windows, or making broader changes tied to an addition or reconfiguration, approvals may come into play. The exact pathway depends on the property, the extent of work and the local council requirements.
Separate from council matters, all plumbing, waterproofing and electrical work must be carried out and certified in strict adherence to the relevant Australian requirements. In practical terms, that means licensed trades, correct documentation and a builder who coordinates sequencing properly so one trade doesn't compromise another.
For homeowners looking at broader accessibility works beyond the bathroom, this guide to aged care home modifications is helpful because it puts the bathroom renovation into the wider context of planning for long-term living at home.
Keep the project on time by locking decisions early
If you want the renovation to run smoothly, finalise selections before works begin wherever possible. Bathrooms are compact spaces with a lot of interdependent trades. A delayed vanity can hold up plumbing fit-off. A late tile decision can affect falls, drainage detailing and waterproofing coordination.
The projects that stay calmer are the ones where the scope is clear, the unknowns are discussed upfront, and the builder has enough information to sequence the trades properly from day one.
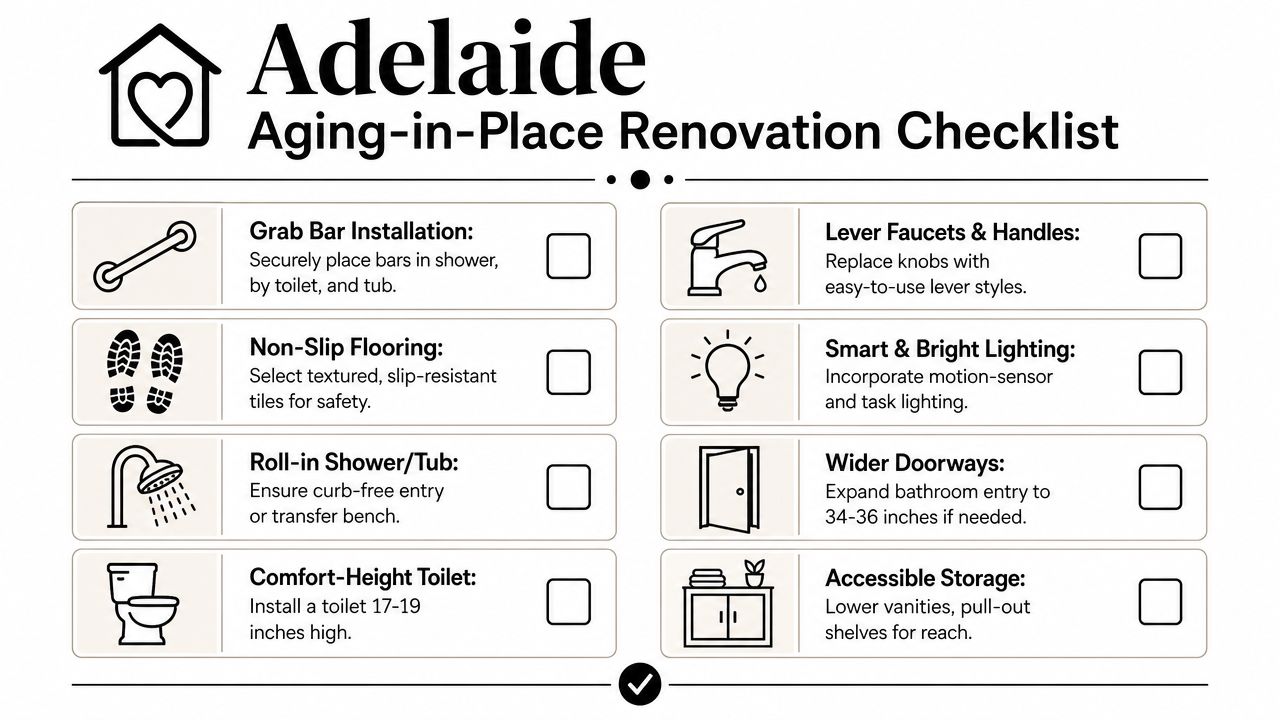
Your Adelaide Aging-in-Place Renovation Checklist
Homeowners usually feel better once the project stops being a vague worry and turns into a list. That's useful because aging in place bathroom design rewards disciplined planning. The right checklist prevents expensive backtracking, keeps discussions clear with your builder and makes trade-offs easier when budget decisions come up.
Think of this as a working document rather than a wish list. If an item matters, write it down and make sure it's shown on the plans or the selections schedule.
Planning and assessment
Start with the people who'll use the bathroom.
- List current pain points: Slippery floors, difficult shower entry, poor lighting, low toilet height, hard-to-reach storage.
- Think beyond today: Include likely future needs such as reduced balance, reduced grip strength or the possibility of assisted use.
- Check the route to the bathroom: Bedroom access, hallway lighting and thresholds matter as much as the room itself.
- Determine your essentials: Usually safety, easy shower access and realistic maintenance.
- Separate needs from preferences: Heated floors might be optional. A safe shower entry usually isn't.
Design and layout decisions
The success or failure of the renovation hinges on this.
- Confirm whether a curbless shower is feasible: Ask what floor works are required, not just whether it looks possible.
- Review movement space carefully: Can you enter, turn and approach each fixture without awkward sidestepping?
- Check door operation: Make sure the door type supports access and emergency entry.
- Allow for future supports: Reinforced walls, shower seating options and usable side space near the toilet should be considered early.
- Reduce clutter points: Too many niches, ledges and freestanding accessories can narrow movement and complicate cleaning.
Selection checklist
Choose items by function first, appearance second.
- Flooring: Confirm slip resistance with the actual product, not the showroom sample alone.
- Tapware: Prioritise lever operation and simple controls.
- Toilet: Test the height and projection in person if possible.
- Lighting: Specify ambient, task and night-time safety lighting separately.
- Storage: Put daily-use items at comfortable reach height.
- Finishes: Choose surfaces that won't constantly show water spotting, soap build-up or grime.
Good selections don't just match each other. They support the way the room is used every single day.
Builder engagement and project management
A smart design can still be let down by poor execution. The builder matters.
Use this final check before signing anything:
- Ask who is coordinating the trades: Bathrooms involve demolition, carpentry, plumbing, waterproofing, tiling, glazing, electrical and joinery. Someone needs clear control of the sequence.
- Request a clear inclusions list: It should spell out fixtures, finishes, demolition extent, disposal, waterproofing scope and allowances.
- Discuss lead times before start: Imported fittings, custom screens and selected tiles can affect programme.
- Clarify how variations are handled: You want a process, not surprises.
- Confirm compliance responsibilities: Licensed work and certification should be standard practice, not an afterthought.
- Talk through disruption: If this is your only bathroom, ask how the builder plans staging, temporary arrangements and site access.
The right next step isn't to collect more inspiration photos. It's to turn your ideas into a buildable brief that reflects how you live, what your home can accommodate and where your budget needs to be protected. That's where a proper consultation earns its value.
If you're planning an aging-in-place bathroom in Adelaide and want a renovation that balances safety, design and practical buildability, talk to Templeton Built. A clear site-based conversation can help you sort the layout, likely construction issues, finish choices and approval pathway before you commit to the wrong plan.


Leave a Reply