

Basic Bathroom Renovation: An Adelaide Guide (2026)
You’re probably looking at a bathroom that has crossed the line from “dated” to annoying. The grout never looks clean. The vanity has no storage. The shower pools water where it shouldn’t. And every morning starts with one small reminder that the room no longer suits the way your household lives.
That’s usually the point where a basic bathroom renovation starts to make sense. Not a fantasy showroom build. Not a weekend paint-and-hardware refresh. A practical renovation that fixes layout issues, updates worn finishes, improves water efficiency, and brings the room up to standard.
In Adelaide, that process needs more than Pinterest saves and rough price guesses. Older housing, council rules, waterproofing requirements, trade coordination, and material choices all affect whether the job runs smoothly or turns into a drawn-out repair project. A bathroom is one of the smallest rooms in the house, but it’s one of the most technical.
Your Guide to a Stress-Free Bathroom Renovation
Most homeowners don’t begin with a blank sheet of paper. They begin with frustration.
It might be a family bathroom in an older Adelaide home where the tiles are cracked, the shower screen leaks onto the floor, and the vanity was designed for a different era. Or it might be a compact ensuite that technically works, but only if nobody needs bench space, storage, or proper lighting. The room still functions, but it doesn’t function well.
That’s where a clear plan changes everything.
A basic bathroom renovation is manageable when you break it into decisions in the right order. First, work out what’s wrong. Then separate the must-fix items from the nice-to-have upgrades. In practice, that means asking simple questions. Does the layout work? Are you keeping fixtures in the same place? Is ventilation good enough? Are you solving a water-damage issue or only updating the look?
Practical rule: If you can’t explain in one sentence why the renovation is happening, the scope usually blows out later.
For homeowners still at the early stage, a good outside reference is this guide on how to plan a bathroom remodel. It’s useful because it pushes the planning conversation beyond colours and finishes and back onto function, budget, and sequence.
A simple checklist helps too, especially before you start requesting quotes or talking to trades. This bathroom remodel checklist is a practical way to sort ideas before they become expensive changes on site.
What makes the process easier
A stress-free renovation usually comes down to three things:
- A tight scope: Keep the project centred on what the room needs.
- Clear selections early: Don’t leave tapware, tiles, or vanity decisions until demolition has started.
- Realistic expectations: Bathrooms involve wet-area trades, compliance, and inspection points. They’re not the room to improvise in.
The homeowners who have the smoothest projects aren’t always the ones with the biggest budget. They’re the ones who make decisions early, understand the trade-offs, and don’t confuse cosmetic ideas with structural or plumbing work.
The Blueprint for Success Planning and Realistic Budgets
A bathroom budget usually blows out before demolition starts. It happens when the plan is still vague, the tile choice changes twice, and nobody has checked whether the new vanity size clashes with the door swing or existing plumbing.

Start with how the room will work
Good planning starts with use, not looks. In older Adelaide homes, that matters even more because bathrooms are often tight, out of square, and built over timber floors that need checking before finishes are chosen.
Set the room up around daily use:
- Effective clearances: Leave enough space to move around the vanity, toilet, and shower without creating awkward pinch points.
- Storage that earns its space: Drawers generally make better use of compact bathrooms than deep cupboards where items disappear at the back.
- Lighting for mirror and room: A bathroom needs practical task lighting, not just a single ceiling fitting.
- Surfaces that clean up easily: Large-format porcelain, simple screen details, and wall-hung joinery reduce grime traps and maintenance.
One decision affects the budget more than homeowners expect. Keep the plumbing layout where it is if the existing positions still work. Shifting a toilet, moving a shower waste, or chasing new pipe runs into brick or slab construction can turn a basic renovation into a much more expensive job.
What a realistic Adelaide budget needs to allow for
A basic bathroom renovation in Adelaide often sits in a broad middle range, but the finish level is only part of the story. The actual cost is shaped by access, existing condition, trade coordination, and whether the room hides problems once the old tiles come off.
For a clearer local cost guide, including what changes push a project up in price, see these Adelaide bathroom renovation cost ranges.
In practice, a realistic budget needs to cover more than fixtures and tiles.
| Budget area | What it usually covers |
|---|---|
| Demolition and disposal | Strip-out of tiles, sheeting, fixtures, and removal of wet-area waste |
| Labour | Plumbing, electrical, waterproofing, tiling, carpentry, plastering, fit-off |
| Fixtures | Vanity, toilet, basin, tapware, shower set, screen, accessories |
| Finishes | Tiles, grout, trims, paint, sealants, adhesives |
| Compliance and checks | Inspection points, certification, and any approval-related costs where required |
Older Adelaide bathrooms often carry hidden costs. Water damage around the shower base, swollen door jambs, failed waterproofing, termite-affected framing, and uneven floors are common finds. They are not unusual. They just need to be allowed for early so they do not derail the job halfway through.
Where the money should go
Some items are worth paying for because replacing them later is disruptive and expensive.
Spend properly on:
- Waterproofing
- Substrate preparation before tiling
- Drainage falls in the shower
- Ventilation that clears moisture properly
- Tapware and plumbing fixtures with reliable parts support
Hold the line on:
- Feature finishes that date quickly
- Cheap imported fittings with no local spare parts
- Vanities built for dry areas rather than wet bathrooms
- Custom changes that add cost without improving function
That trade-off matters if resale is part of the plan. Buyers usually notice layout, cleanliness, storage, and whether the room feels solid. They rarely pay extra for expensive finishes that do not improve how the bathroom works. This article on maximize your bathroom remodel return on investment is a useful outside reference for separating value-adding choices from cosmetic overspend.
Cheap bathroom work usually shows up later as swollen joinery, cracked grout, failed sealant, poor drainage, or fittings that cannot be serviced.
The planning habit that prevents site delays
Lock in selections before the strip-out starts. That means tiles, vanity size, tapware, mirror, lighting, shower screen type, and any recessed shaving cabinet or niche detail.
I have seen straightforward jobs lose time because one item was left undecided. A late vanity can change plumbing set-out. A discontinued tile can hold up waterproofing and tiling. A mirror cabinet ordered without checking wall depth can clash with services. Early decisions keep the sequence tight, and that is what protects both budget and finish quality.
Navigating Adelaide's Rules Permits and Inspections
A bathroom strip-out starts on Monday. By Wednesday, the owner finds out the new layout needs approval because the toilet is shifting, a wall nib is being altered, and the house sits in a character area. That is how a straightforward renovation turns into delays, redraws, and extra cost.
In Adelaide, approval questions usually come from scope, not size. A bathroom can be small and still trigger formal requirements if you are moving sanitary fixtures, changing drainage, touching structural elements, or working on a property with heritage or planning constraints.
When approval becomes part of the job
The rule of thumb is simple. If the work changes more than finishes, check the approval path before demolition.
In South Australia, bathroom work can involve planning consent, building rules consent, and plumbing approval, depending on what is changing. The common triggers are familiar on site:
- Relocating a toilet or shower waste
- Changing drainage runs or plumbing set-outs
- Altering walls, door openings, or structural framing
- Working on a home affected by heritage or character controls
- Making changes that affect external drainage, ventilation, or other regulated services
I see owners get caught when they assume internal work stays outside council or certifier review. That assumption is expensive, especially in older Adelaide suburbs where site history, additions, and prior unapproved work can complicate what looks like a basic renovation.
Why older Adelaide homes need closer checking
A 1960s or 1970s bathroom often hides more than tired tiles. I regularly find out-of-plumb walls, patched plumbing, damaged substrate, and exhaust fans that never vented properly. In villas, bungalows, and stone-fronted homes, the paper trail can be just as important as the room itself.
Applications usually stall for predictable reasons. The scope is vague. The plans do not match the existing dwelling. Drainage or structural implications have not been shown clearly. Heritage overlays or local policy areas were not checked early enough.
A layout can work perfectly inside the room and still run into trouble if the documents ignore the property conditions and the approval pathway.
Good documentation saves time. Existing and proposed plans, a clear description of the works, and trade-specific details where needed give council, certifiers, and plumbers something they can assess properly.
For a plain-English breakdown of the approval process, read this guide on how to get a building permit for residential work before locking in layout changes.
What to check before lodging anything
Start with these questions:
Are any fixtures moving from their current positions?
A new waste location or toilet position can change the approvals and the build cost.Are you changing walls, openings, or framing?
Even small structural changes need proper assessment.Is the property affected by heritage, character, or local planning controls?
This comes up often across established Adelaide suburbs.Will the work affect regulated items such as plumbing, ventilation, waterproofing support conditions, or site drainage?
If yes, the design and paperwork need to be right before work starts.
The practical trade-off is straightforward. Spending time on approvals early feels slow, but it is cheaper than stopping a job mid-stream to redraw plans, rebook trades, or undo work that should not have started.
The Renovation in Motion Demolition and Trades Sequencing
A bathroom job usually goes off the rails after demolition, not before it. The room is open, everyone wants momentum, and one trade gets pushed in before the room is ready for them. That is how Adelaide bathroom renovations end up with damaged membranes, wrong set-outs, and shower floors that never drain properly.
Order matters because each layer depends on the one underneath. If the substrate is out, the waterproofing is compromised. If the rough-in is wrong, the tiler starts making compromises that show up at fit-off.
The order that works on site
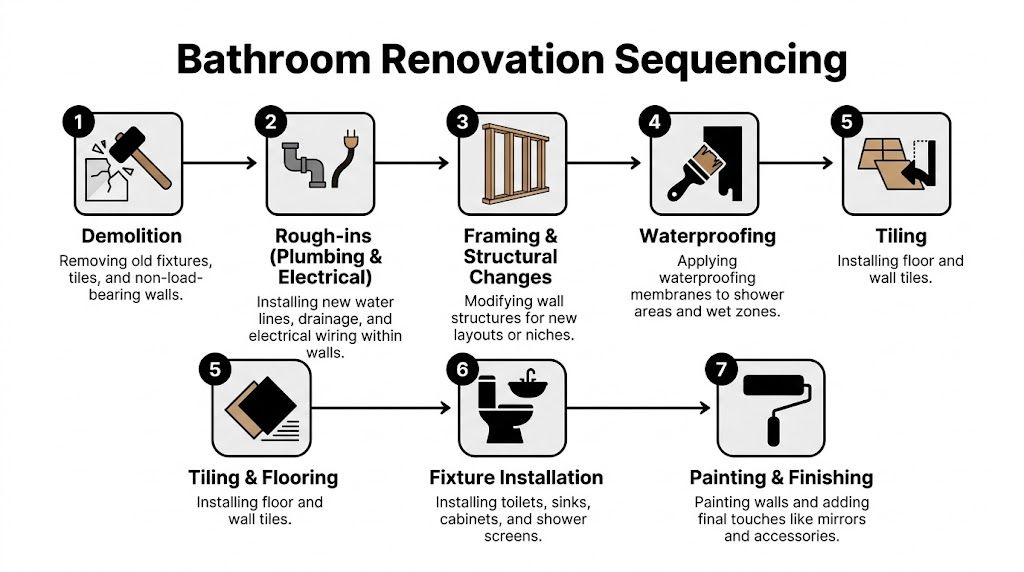
On a straightforward bathroom renovation, this sequence avoids rework and keeps each trade working on a room that is ready.
Demolition
Strip out fixtures, tiles, linings, and any damaged sheeting. The job here is to expose the room cleanly so the floor, wall framing, and existing services can be inspected properly.First-fix plumbing and electrical
New wastes, water lines, wiring, lighting points, and exhaust fan rough-ins go in before the room is closed up. In South Australia, licensed trades need to carry out this work, and plumbing has to comply with AS/NZS 3500.Framing and substrate corrections
Straighten walls, repair damaged framing, pack out uneven areas, and fix floor levels where needed. If a niche, in-wall cistern, or recessed shaving cabinet is part of the plan, sort it out here, before waterproofing starts.Waterproofing
This stage depends on dry, stable, correctly prepared surfaces. In wet areas, waterproofing needs to meet AS 3740, and on Adelaide jobs the failures I see are usually tied to poor prep, rushed curing, or penetrations that were never detailed properly.Tiling
Wall and floor tiles go down once the membrane is cured and the set-out is confirmed. This is also where falls to wastes, cut positions, trims, and grout joint alignment need to be checked before adhesive starts going on the wall.
A short visual helps if you want to see the sequence laid out clearly:
Second-fix or fit-off
Install the vanity, toilet, taps, shower fittings, mirrors, lights, and accessories once finished surfaces are complete and protected.Painting, sealing, and final checks
Final painting, silicone, testing, cleaning, and defect checks happen last. This stage picks up drainage issues, loose fittings, poor seals, and minor damage before handover.
The quality checks that matter
Australian building regulators and industry guides consistently identify falls, waterproofing, and penetrations as common failure points in wet areas. In practice, one of the most common defects is a shower floor that holds water because the falls were not formed or tiled correctly. That problem usually starts earlier than people think. It often traces back to the screed, the waste position, or a rushed tile set-out.
On site, the checks are practical.
- Substrate is sound: No rot, flex, loose sheeting, or water-damaged framing.
- Set-outs are confirmed: Mixer heights, waste locations, vanity centring, niche position, and toilet clearances are locked in before linings and tiles.
- Falls are checked before and after tiling: Water has to run to the waste without ponding in corners or at the shower entry.
- Membrane coverage is complete: Corners, hob details, wall-floor junctions, and service penetrations need full treatment.
- Tile layout is resolved early: Small cuts, uneven margins, and misaligned feature tiles are easier to fix on paper than after waterproofing.
I would add one Adelaide-specific point here. In many older suburbs, once demolition is done, you find out the room is far less square than the original plans suggested. Brick movement, patched floors, and earlier DIY work can throw out levels badly. If that is not corrected before waterproofing and tiling, the finished bathroom may look acceptable in photos and still perform poorly in use.
A bathroom can pass a quick visual check and still fail because the floor waste, membrane details, or tile falls were wrong.
What not to do
The avoidable mistakes are usually sequencing mistakes.
Avoid:
- Starting waterproofing before framing and sheeting are fully corrected
- Letting tilers begin before falls, wastes, and substrate condition are verified
- Installing a custom shower screen before final tile dimensions are confirmed
- Changing tapware, mixers, or vanity selections after rough-in
- Stacking trades into the room at once just to save a day on the programme
The trade-off is simple. Rushing saves a little time in the middle of the job and costs more at the end. On managed bathroom renovations, someone needs to check each stage, sign off readiness for the next trade, and catch defects before they are buried under the next layer. That is the difference between a bathroom that looks finished and one that stays dry, drains properly, and holds up.
Choosing Your Finishes Materials and Fixtures That Last
You notice poor selections after handover, not in the showroom. A vanity starts swelling at the kickboard, the grout stains faster than expected, or the shower rail looks fine but never gives a decent spray. In Adelaide bathrooms, where many homes carry a mix of older construction, patched substrates, and hard daily use, finishes need to do more than look good on install day.
They need to suit the room, the budget, and the way the bathroom will be used.

Start with products that cope with moisture
Porcelain tile is still the reliable workhorse for most bathroom floors and walls. It wears well, cleans easily, and does not ask for much maintenance if it has been laid properly over a sound substrate. For a basic bathroom renovation, that is hard to beat.
Vanities deserve closer scrutiny than they usually get. I look past the door fronts and check the carcass material, edging, backing, and how well the interior will cope with condensation and regular splashing. A vanity can look solid under showroom lighting and still fail early if the board quality is poor or the exposed edges are not protected.
Grout is another area where cheap decisions show up fast. Cement grout still has its place, but in family bathrooms or tight shower areas, epoxy grout often earns its extra cost. It resists staining better and generally gives fewer maintenance problems over time. The trade-off is a higher upfront price and a tiler who knows how to install it properly.
Choose fixtures on performance first
Style matters, but bathroom fixtures are service items. They need local parts support, decent warranty backing, and pressure compatibility with the home they are going into.
In Adelaide, water efficiency also matters because it affects running costs over the life of the bathroom. SA Water publishes household water use guidance and efficiency advice, and WELS ratings give a useful baseline when comparing showers, taps, and toilets (SA Water water use and efficiency advice).
A practical shortlist usually includes:
- WELS-rated showerheads that still provide a usable spray pattern
- Toilets with proven flush performance, not just a good spec sheet
- Mixer taps with local parts availability so repairs do not become a replacement job
- LED lighting with the right colour temperature for shaving, makeup, and general use
- Exhaust fans sized for the room, especially in older homes where moisture lingers
That last one gets overlooked. Good finishes last longer when steam is removed properly.
Materials that often disappoint
Some products create problems because they promise an easier path than they deliver.
Vinyl plank is one I assess carefully in bathrooms. In the right dry area, it can work. In a wet room, especially where floor prep is inconsistent or water control is poor, it can become the first finish to show that something underneath was not right. If moisture gets into the wrong place, the whole room starts looking second-rate.
Natural stone is another common misstep for basic renovations. It can look excellent, but it needs sealing, more disciplined cleaning, and a client who understands the maintenance. If the brief is durability with low fuss, porcelain is usually the better call.
Matte black tapware also deserves caution. Some ranges hold up well. Others show wear, mineral spotting, or finish inconsistency much sooner than chrome or brushed nickel. That does not make it a bad choice, but it does mean brand and coating quality matter more than colour trend.
Choose finishes you can maintain without constant effort, and fixtures you can repair without replacing half the room.
A practical filter for final selections
Before approving any finish or fixture, I would want clear answers to these questions:
| Question | Why it matters |
|---|---|
| Will it cope with regular moisture and cleaning | Bathrooms expose weak materials quickly |
| Can replacement parts be sourced locally | Tapware and cistern issues are easier to fix when parts are available |
| Does it need sealing or special maintenance | Some good-looking products become a burden in everyday use |
| Will the finish hide water spotting and wear reasonably well | Important in busy family bathrooms |
| Does the cost match the life expectancy | Paying more only makes sense if you get longer service or fewer repairs |
Templeton Built is one Adelaide option for homeowners comparing builder-managed renovation pathways with independent designers and separately engaged trades.
Common Pitfalls and When to Engage a Builder
A bathroom can look finished at handover and still be heading for trouble. In Adelaide homes, I see the same pattern too often. Fresh tiles, new tapware, clean silicone, then six months later there is ponding in the shower, swollen skirting outside the door, or a loose tile because the substrate was never right.
Those failures usually start well before the room looks complete. They come from rushed set-out, poor trade coordination, missed checks before waterproofing and tiling, or product selections made after the job is already underway.
The avoidable problems
The repeat offenders are predictable:
- Incorrect shower falls: Water sits in corners or tracks out onto the main floor. That creates daily frustration and long-term moisture issues.
- Poor waterproofing preparation: A membrane is only as good as the substrate, junctions, penetrations, and curing conditions underneath it.
- Late fixture and fitting decisions: If the vanity, tapware, screen, or trim kit is not on site when needed, the whole sequence starts slipping.
- Split responsibility across trades: When plumbers, sparkies, tilers, and cabinetmakers are all separately engaged, defects can turn into an argument about who caused what.
- Cheap fixtures in a wet area: The upfront saving often turns into service calls, replacement parts, and premature wear.
Timing catches people out as well. Adelaide projects rarely run well when key items are ordered late or when one trade is booked before the previous stage has been checked and signed off. A delayed shower screen can hold up completion. A vanity with the wrong waste position can send plumbing back into the wall. Small misses create expensive disruption.
When DIY stops making sense
There is a clear difference between cosmetic work and construction work.
Painting, changing mirrors, swapping towel rails, and replacing basic accessories can suit a capable homeowner. Once the job involves waterproofing, drainage, new circuits, lighting changes, wall removal, altered plumbing positions, or any work that triggers approvals or compliance requirements, the risk lifts fast.
That is where builder oversight usually saves money rather than adding cost.
In practice, a builder is there to control sequence and check quality at the points that matter most. That includes confirming the set-out before rough-in, checking floor and wall prep before waterproofing, making sure tile lines work with wastes and niches, and dealing with site surprises in older Adelaide homes, especially where termite damage, out-of-level floors, or previous patch-up work shows up after demolition.
A simple decision test
Professional oversight is usually the right call if any of these apply:
- You are changing the layout
- The home is older and hidden damage is likely
- The work may need approval, compliance checks, or licensed trade certification
- More than two trades need to be sequenced tightly
- A leak, delay, or rework bill would put pressure on the budget
I would add one more. If you do not know how to check the work before it gets covered, bring in someone who does.
Bathroom issues often develop unnoticed. By the time a problem is visible, the repair often means removing finished tiles, screens, cabinetry, or plasterboard to get back to the underlying cause. For anything beyond a surface update, having a builder manage the process is often the more practical path.
If you are planning a basic bathroom renovation in Adelaide and want a straight answer on scope, budget, approvals, and buildability, speak with Templeton Built. We work across renovations, extensions, and custom residential projects, with practical guidance from early planning through construction.


Leave a Reply