

How To Read Architectural Drawings: Renovation Guide
You’ve just received your plans. Maybe it’s a rolled set from the designer, maybe it’s a PDF with sheet names that look like code, and maybe your first reaction is the same one most homeowners have. Excitement, followed by a quiet sense that you’re meant to understand far more of this than you currently do.
That’s normal.
A good drawing set isn’t only for architects and builders. It’s the shared reference for your renovation, extension, or new home. If you can read the basics, you’ll ask better questions, catch lifestyle issues earlier, and move through approvals with more confidence. That matters in Adelaide, where local overlays, setbacks, energy requirements and council expectations shape the plans in ways many generic overseas guides don’t address.
A lot of online advice on how to read architectural drawings is written around US examples. That’s where people get tripped up. In South Australia, 2025 HIA data shows 68% of homeowners struggled with DA-approved drawing compliance, leading to 22% project delays because they misread zoning setback hatches or glazing schedules required under NCC Volume Two (supporting reference). Australian plans carry their own conventions, standards and compliance notes, so they need to be read in that context.
Your First Look at the Architectural Drawing Set
The first job isn’t reading every note. It’s working out what you’re holding.

When clients open a plan set for the first time, they often jump straight to the kitchen or bathroom. Fair enough. Those are emotional spaces. But the better approach is to sort the set into categories first, the same way you’d scan the chapters of a book before reading closely.
Start with the sheet family
Most residential sets include several drawing types, each doing a different job.
- Site plan. This shows the block, boundaries, setbacks, easements, orientation and where the building sits on the land.
- Floor plans. These are the overhead views of rooms, walls, doors, windows and circulation.
- Elevations. These show the outside faces of the house, including roof shape, external materials and window placement.
- Sections. These are cut-through views that reveal how the building is assembled vertically.
- Details and schedules. These handle the fine print. Junctions, flashings, finishes, fixtures and notes.
If you want a simple visual primer before diving into your own set, a plain-English construction plan example can help you recognise the difference between sheet types without getting buried in technical terms.
What each drawing is trying to tell you
Think of the site plan as the planning and approval sheet. On this sheet, local rules begin to appear. In Adelaide projects, this typically involves boundary relationships, private open space, setbacks, and other DA-sensitive items.
The floor plan is the lifestyle sheet. It allows you to test daily use. Can you carry groceries in easily? Does the laundry door clash with cabinetry? Is the ensuite private enough? Floor plans answer those questions better than any pretty render.
The elevations are the street-view sheet. They tell you what the build will look like from the outside, how the windows line up and how the roof form will present.
The sections are where things get real. They show ceiling heights, floor levels, roof build-ups, insulation depth and how one part of the structure connects to another.
Practical rule: Don’t judge the design from one sheet alone. A window that looks perfect in plan can feel too low, too high or poorly shaded once you check the elevation and section.
Your first five-minute review
Before reading thoroughly, look for these items:
- Sheet index so you know what’s included.
- Drawing title on each page so you know what you’re viewing.
- Revision status so you don’t review an old version.
- Scale so you know whether you’re looking at a whole plan or a detail.
- North point so you understand light, heat and orientation.
If you’re still at the early concept stage, it also helps to compare the plans against a proper design and drafting process so you know which items are fixed, which are still developing and which details usually come later.
Mastering the Language of Lines Symbols and Scales
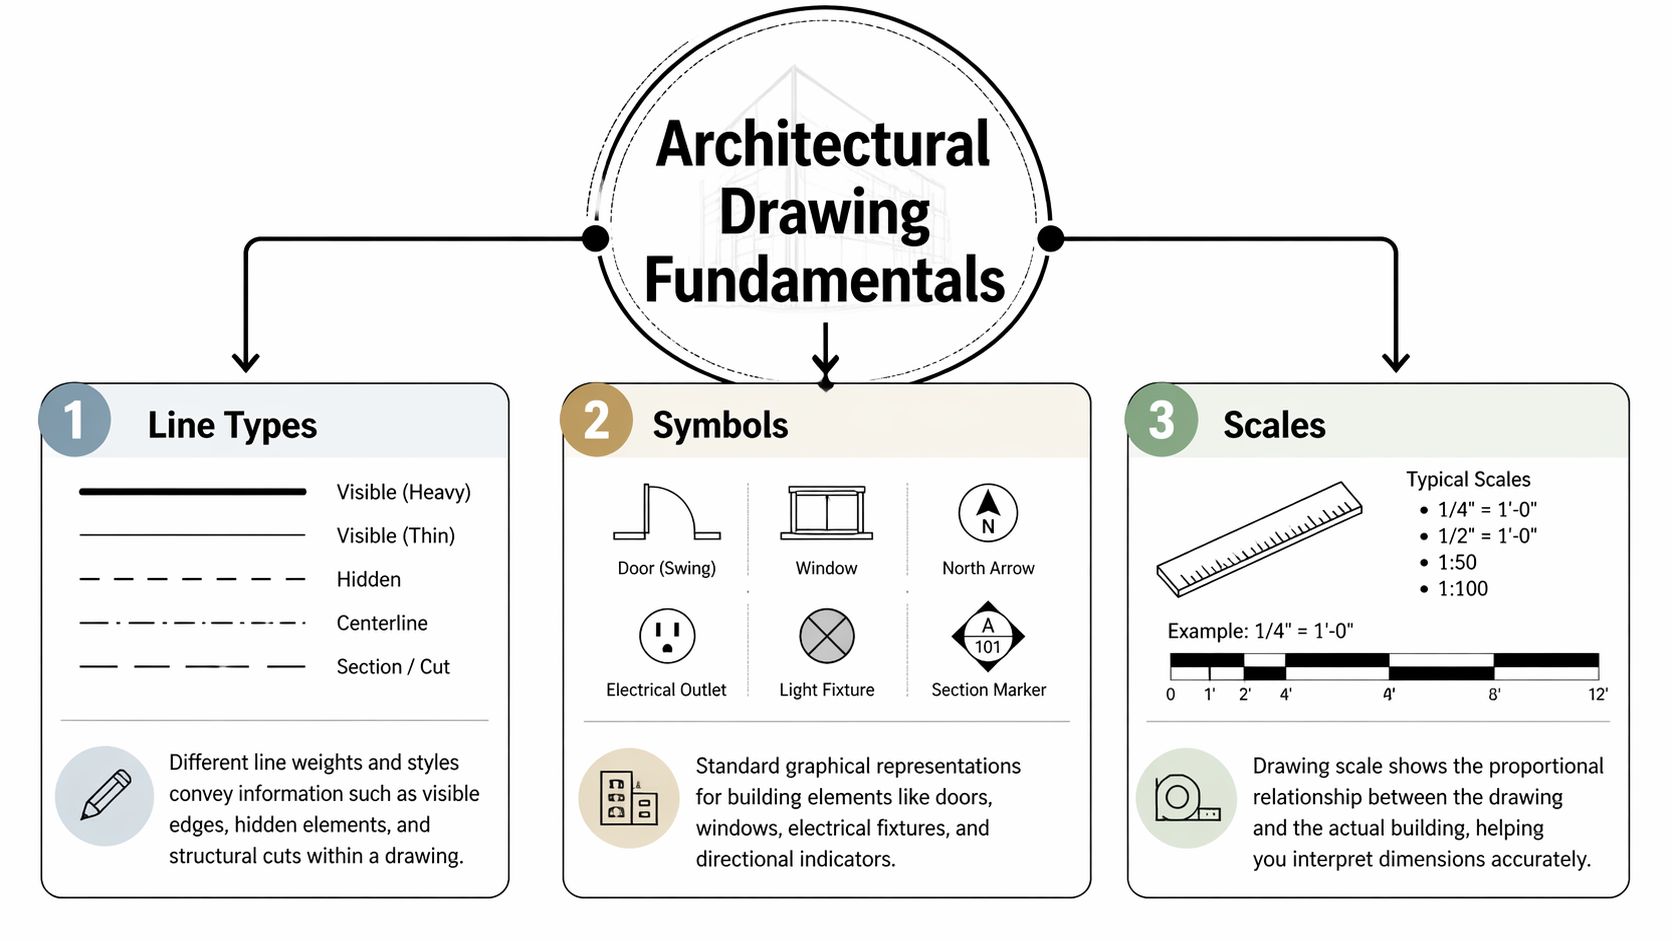
Architectural drawings only become useful once you understand their visual language. Most confusion comes from three things. Scale, line weight, and symbols.
Scale tells you how big the drawing really is
On Australian residential plans, 1:100 is common for A1 site plans, and at that scale a 10m wall measures 100mm on paper. Australian drawings also rely on standards such as AS 1100, where those conventions need to be read consistently. Line weights matter too. Thick lines of 0.5 to 1.0mm often indicate walls, while thin dashed lines typically show hidden elements. In practice, reading those conventions properly helps builders produce more reliable pricing. The same reference notes that this approach helps achieve 98% accuracy in cost estimates, avoiding $50,000+ rework seen in 12% of non-compliant projects per 2024 HIA stats (supporting reference).
That sounds technical, but the practical lesson is simple. Never eyeball size from a drawing.
A room can look generous on screen and feel tight once built. Scale protects you from that mistake. If the plan is printed to scale, use a scale ruler. If you’re reading a PDF, trust the written dimensions first, then ask your designer or builder to confirm any critical clearances.
Line weight shows what matters most
Lines on plans aren’t decorative. They rank information.
A thick solid line usually marks something being cut through or seen prominently, such as a wall. A lighter line often shows items beyond or above. A dashed line usually means hidden, overhead or not directly visible in that view.
This is one reason beginners misread floor plans. They treat all lines as equal. They’re not.
If two rooms seem confusing, look at the darkest lines first. They usually define the actual built form before secondary items like overhead cupboards, bulkheads or hidden structural elements.
Symbols work like a map legend
Symbols compress a lot of information into a small space. Once you know the common ones, drawings start to read faster.
A door is usually shown with an arc that indicates swing direction. A window appears as a break in a wall line. Fixtures, appliances, north points and section markers all use standard symbols so the page doesn’t become overloaded with text.
Here’s a quick reference for the items homeowners most often ask about.
| Symbol | What It Represents | Common Notes |
|---|---|---|
| Door arc | Door swing direction | Check that the swing doesn’t hit cabinetry, a vanity, or another door |
| Window break in wall | Window opening | Review sill height, opening type, and whether privacy is adequate |
| Dashed line | Hidden or overhead element | Often used for overhead cupboards, roof lines, or elements above cut line |
| Section marker | Location of a cut-through view | Follow this to find the sheet that explains height and build-up |
| North arrow | Site orientation | Important for sunlight, shading and room comfort |
| Hatch pattern | Material or regulated area | May indicate masonry, insulation, setbacks or compliance-related zones |
| Fixture symbol | Plumbing or joinery element | Confirm exact model and size in schedules, not by symbol alone |
What works and what doesn’t
What works is reading plans in layers. Start with dimensions, then walls, then openings, then notes. What doesn’t work is trying to decode every mark at once.
Another mistake is assuming the symbol tells the whole story. It doesn’t. The symbol tells you what category of thing you’re looking at. The note, schedule or referenced detail tells you exactly what it is.
Visualising in 3D with Elevations and Sections
Floor plans tell you where things are. They don’t tell you how they’ll feel vertically.
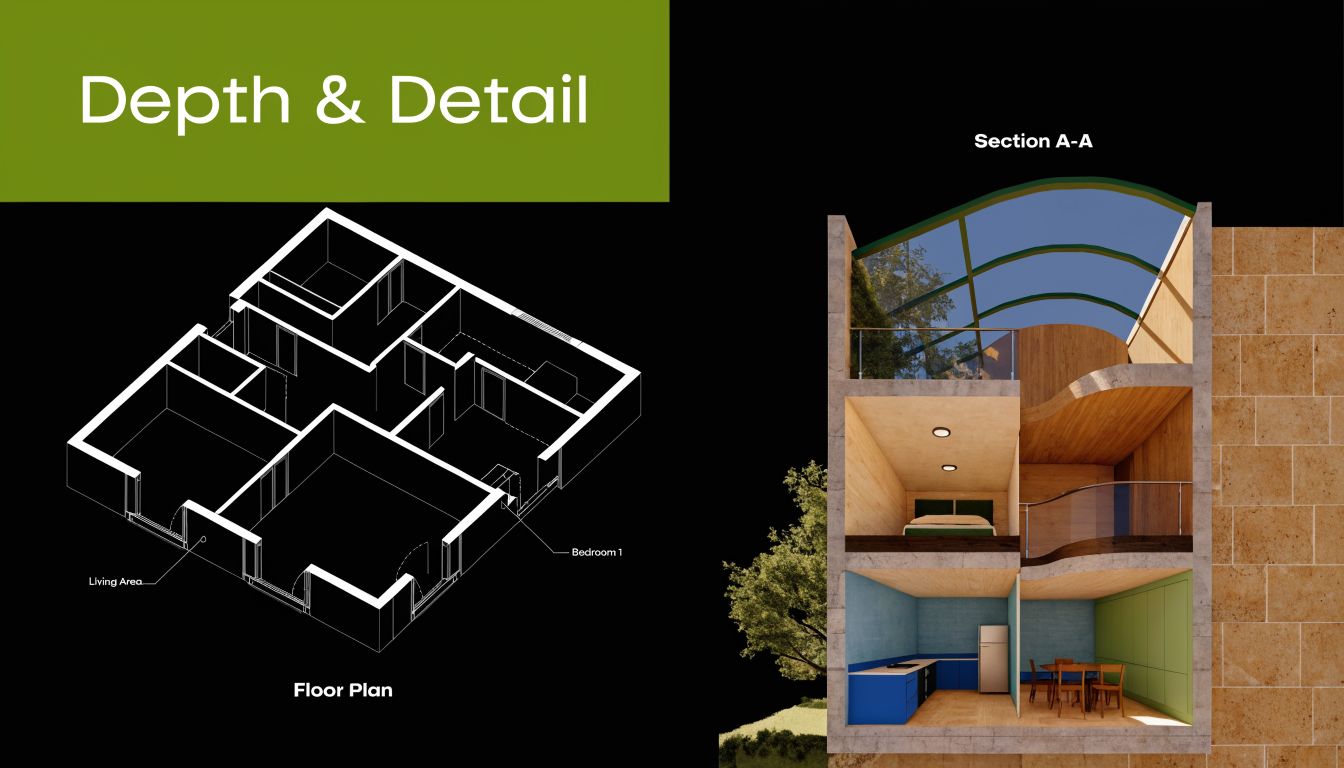
That’s why many homeowners can follow a floor plan reasonably well but still struggle to imagine the final home. The missing piece is usually the elevations and sections.
Elevations show the outside face
An elevation is the flat view of one side of the building: front, rear, left, and right. It is used to judge proportion.
Look at window head heights. Check whether external cladding lines up neatly. Study the roof shape. On paper, the façade often seems straightforward, but elevations reveal whether the composition feels balanced or awkward.
They also help you spot practical issues. A high window may protect privacy but reduce outlook. A broad expanse of glazing may look attractive but still needs to make sense for orientation and shading.
Sections show the building cut open
Sections are the drawings that most improve a client’s understanding. Think of them like slicing through a dollhouse or a layer cake so you can see inside.
A section shows how the slab, floor, walls, roof and ceiling relate vertically. It also reveals the hidden stuff that has major consequences later. Insulation, framing depth, roof build-up, ceiling rake, window head clearance and flashing conditions.
If a room looks fine in plan but you’re unsure whether it will feel spacious, the section will usually answer that more clearly than the floor plan.
A ceiling height written on a plan is information. A section that shows how that height sits beside windows, bulkheads and roof pitch is understanding.
A quick visual walkthrough can help if you’re new to this style of drawing:
How to cross-check the two
Use elevations to understand appearance. Use sections to understand construction and space.
When reviewing them, ask:
- Does the exterior match the floor plan? Window locations should line up across views.
- Do heights feel right? Ceiling lines, sill levels and external proportions should make sense together.
- Are tricky areas explained? Stairs, raked ceilings, voids and wet areas usually need section detail.
- Can you see buildability? If a junction seems vague on paper, it may need a larger detail before construction.
What works here is cross-referencing. What doesn’t work is relying on renders alone. Renders help with mood. Sections and elevations help with decisions.
Reading Beyond the Lines Schedules Notes and Revisions
The drawing is only half the contract. The rest lives in the words around it.
Clients often focus on room layout and façade appearance, then skim past the schedules, notes and title block. That’s where many expensive misunderstandings begin. A plan may show a bathroom vanity in the right place, but the schedule decides whether it’s wall-hung or floor-mounted, laminate or veneer, single basin or double.
Title blocks matter more than most people think
On Australian projects, title blocks on G-series sheets such as G1 for the index and G2 for abbreviations list revisions, and that revision trail is critical. 35% of 2022 SA DAs faced delays from outdated sheets (supporting reference). That’s why the first check on any page should be the sheet title, revision number and issue status.
If you’re comparing comments from your designer, a builder’s estimate and a council response, everyone needs to be looking at the same revision. If they aren’t, confusion follows quickly.
Notes and schedules carry the real specification
A floor plan can only show so much graphically. Schedules and notes fill in the missing detail.
Look for these text-based items:
- Door and window schedules that identify types, sizes and sometimes hardware intent.
- Finish schedules that nominate flooring, skirtings, paint systems or tiling locations.
- General notes that apply across the project, including construction expectations and compliance references.
- Detail call-ups that direct you to enlarged junctions, especially in wet areas and external openings.
Generic overseas references can mislead people. For instance, a homeowner might search broad guides like standard door sizes in Canada to get a feel for proportions, but that kind of article is useful only as a general comparison. It won’t tell you what your Australian drawing set, supplier selections or compliance notes require.
The small details that prevent bigger problems
Some of the most important information appears on enlarged details rather than the main plans. The same Australian reference notes that 1:50 is often used for details within 1:20 sections showing junctions like flashings, including mandatory 150mm overlaps per NCC. Those aren’t glamorous pages, but they’re the pages that stop water getting in.
The prettiest drawing in the set won’t save a project from a badly understood note about waterproofing, thresholds or external drainage.
If you’re managing lots of consultant information, approvals and updated sheets, a disciplined construction documentation management approach is what keeps everyone aligned. Homeowners don’t need to run the project paperwork themselves, but they do need to know that the latest issue governs the work.
Your Pre-Construction Checklist for Reviewing Plans
By the time plans feel readable, the next step is using that understanding to pressure-test the design before building starts.

Homeowners add real value in this phase. Not by redrawing the project, but by walking through it mentally and noticing how daily life will work. Broad renovation planning articles like how to plan a home renovation can help frame early decisions, but once your drawings exist, the review needs to become specific.
Walk the house in your head
Start at the street and enter the home as you’ll use it. Carry shopping in. Open the car door. Move through the hallway. Stand at the kitchen bench. Sit at the dining table. Put towels away. That mental rehearsal reveals more than a casual glance at the plan ever will.
Ask yourself where bags land, where shoes go, where bins sit, where the dog sleeps, where guests will pause awkwardly, and whether circulation paths stay clear when doors are open.
Questions worth asking before construction
Use a checklist that blends practical use with buildability.
- Furniture fit. Does the bed allow room for bedside tables and walking space? Does the sofa arrangement fight the windows or TV location?
- Storage reality. Is there storage where clutter occurs, not just where it looked neat on paper?
- Kitchen workflow. Can more than one person use the space without crossing paths constantly?
- Power and lighting. Are outlets where lamps, chargers, appliances and desk setups will really go?
- Privacy and sightlines. Can visitors see straight into bedrooms or bathrooms from living areas or entries?
- Natural light. Which rooms get morning light, and which might overheat later in the day?
- Wet area function. Can shower doors, vanity drawers and toilet access all work at the same time?
- Outdoor use. Does the inside connect naturally to where you’ll eat, sit or supervise children outside?
Why this review changes outcomes
Most plan problems aren’t dramatic drafting mistakes. They’re ordinary life issues that nobody flagged early enough. A robe that’s too shallow. A laundry door that blocks storage. A study nook with nowhere for cables. A shower screen that makes the towel rail awkward.
Those are cheap to solve on paper and frustrating to solve on site.
One useful test: if you can’t describe how a room works from wake-up to bedtime, you probably need to review that room again before signing off.
It also helps to understand the compliance frame around the design. If you need a plain-English refresher on the rules behind many drawing requirements, this guide on what a building code is gives useful context for why certain items appear on plans whether or not they were part of your original wishlist.
Frequently Asked Questions from Homeowners
What should I do if I think I’ve found a mistake?
Don’t mark it down as a mistake straight away. Treat it as a query.
A lot of apparent errors come from reading one sheet in isolation. The floor plan may suggest one thing, but a note, schedule or detail may clarify it elsewhere. Circle the item, write down the sheet number, and ask your designer or builder to explain how that element is intended to work.
The most useful questions are precise. “This looks wrong” is hard to respond to. “On sheet A3, the linen cupboard depth looks tight once the hallway door is open. Can we confirm the clearance?” gets answered quickly.
How are changes handled after plans are approved?
Changes should be formal, documented and reissued. Verbal changes are where confusion starts.
If you want to move a window, alter joinery, change a room function or revise a fixture layout, ask for the change to be reflected in updated drawings or written variation documents before work proceeds. Even small design changes can affect approvals, ordering, coordination and pricing.
This is one of the main reasons plan literacy matters. When you understand how to read architectural drawings, you’re more likely to pick up changes early, when they’re easier to document and manage.
What’s the difference between 2D drawings and BIM?
Traditional 2D drawings are the standard plans, elevations, sections and details printed on sheets or viewed as PDFs. BIM, or Building Information Modelling, adds a digital 3D model that can coordinate architecture, structure and services more interactively.
For homeowners, BIM can be helpful, but it can also be confusing without guidance. A Master Builders Australia 2026 survey revealed 74% of Adelaide families commissioning extensions found BIM model clashes unreadable without guidance. The same reference notes that BIM requires understanding Level of Development, or LOD, annotations to visualise features such as passive solar orientation, which is important for the 7-star NatHERS baseline mandated from May 2025 (supporting reference).
The practical difference is this:
- 2D drawings are better for exact documentation, dimensions and approvals.
- BIM models are better for visualising relationships, detecting clashes and helping non-professionals understand space.
Neither replaces the other well on its own. For most residential clients, the best outcome comes when the team can explain the 3D model using the same decisions shown on the 2D set.
Do I need to understand every symbol and abbreviation?
No. You need to understand the ones that affect your use of the home, your approvals and your budget.
That usually means room layout, doors and windows, key dimensions, wet areas, notes relating to materials or compliance, and anything tied to a change you’re considering. You don’t need to become a draftsperson. You do need enough fluency to recognise when you need clarification.
When should I stop reviewing and sign off?
Sign off when the plans answer the big practical questions clearly. You know how the rooms work, what the key finishes are, which revision is current, and what still needs final selection. If you’re still relying on assumptions, keep reviewing.
A build runs more smoothly when the homeowner stops guessing and starts asking informed questions. That’s the payoff.
Templeton Built helps Adelaide homeowners, families and developers move from early concepts to clear, buildable documentation and well-executed construction. If you’re planning a renovation, extension or custom home and want experienced guidance through design, approvals and delivery, explore Templeton Built.


Leave a Reply